
How to Create Gmail Account:- Creating a Gmail account is a straightforward process that gives you access to a wide range of Google services such as Google Drive, Google Docs, Google Photos, and more. Whether you’re new to the digital world or just looking for a reliable email service, Gmail is a great choice. In this article, we’ll provide you with a comprehensive step-by-step process to create your own Gmail account.
How to Create a Gmail Account:-In this guide, we will provide you with a detailed, step-by-step process to create your own Gmail account. From entering your personal information to setting up account security, we’ll cover everything you need to know to get started. By following these easy instructions, you’ll be ready to start using your new Gmail account in no time.
How to Create Gmail Account Overviews
| Post Name | Create Gmail Account |
| Post Type | Technology |
Step By Step Process For How to Create Gmail Account?
Step 1: Visit the Gmail Sign-Up Page
- Open your web browser and go to the Gmail sign-up page.
- Click on “Create account.”
- अपना वेब ब्राउज़र खोलें और Gmail sign-up page पर जाएँ।
- “खाता बनाएँ” पर क्लिक करें।
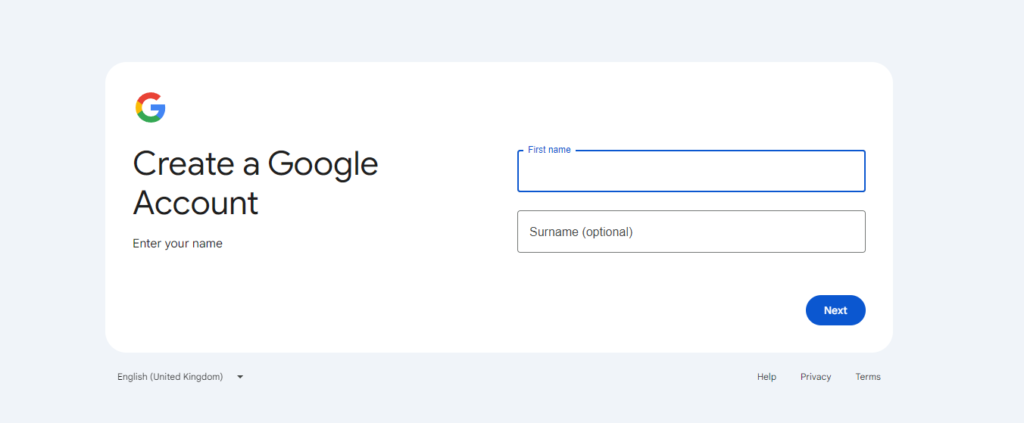
Step 2: Enter Your Personal Information
- You will be prompted to enter your first and last name.
- Choose a unique username. This will be your email address (e.g., yourname@gmail.com). If your chosen username is already taken,
- Google will suggest alternatives or you can try a different one.
- आपको अपना पहला और अंतिम नाम दर्ज करने के लिए कहा जाएगा।
- एक अद्वितीय उपयोगकर्ता नाम चुनें। यह आपका ईमेल पता होगा (उदाहरण के लिए, yourname@gmail.com)। यदि आपका चुना हुआ उपयोगकर्ता नाम पहले से ही लिया गया है,
- तो Google विकल्प सुझाएगा या आप कोई दूसरा उपयोगकर्ता नाम आज़मा सकते हैं।
Step 3: Create a Password
- Enter a strong password that you can remember. It should be at least 8 characters long and include a mix of letters, numbers, and symbols.
- Confirm your password by entering it again in the provided field.
- एक मजबूत पासवर्ड डालें जिसे आप याद रख सकें। यह कम से कम 8 अक्षरों का होना चाहिए और इसमें अक्षरों, संख्याओं और प्रतीकों का मिश्रण शामिल होना चाहिए।
- दिए गए फ़ील्ड में इसे फिर से दर्ज करके अपना पासवर्ड कन्फ़र्म करें।
Step 4: Verify Your Phone Number
- Google will ask you to provide a phone number for account security. Enter your phone number and click “Next.”
- You will receive a verification code via SMS. Enter the code in the provided field to verify your phone number.
- Google आपसे अकाउंट की सुरक्षा के लिए फ़ोन नंबर देने के लिए कहेगा। अपना फ़ोन नंबर डालें और “अगला” पर क्लिक करें।
- आपको SMS के ज़रिए एक सत्यापन कोड मिलेगा। अपना फ़ोन नंबर सत्यापित करने के लिए दिए गए फ़ील्ड में कोड डालें।
Step 5: Enter Recovery Information
- Add a recovery email address (optional) to help recover your account in case you forget your password.
- Enter your date of birth and gender. This information helps Google provide a personalized experience and recover your account if needed.
- यदि आप अपना पासवर्ड भूल जाते हैं तो अपने खाते को पुनर्प्राप्त करने में सहायता के लिए एक recovery email address (optional) जोड़ें।
- अपनी जन्मतिथि और लिंग दर्ज करें। यह जानकारी Google को एक वैयक्तिकृत अनुभव प्रदान करने और ज़रूरत पड़ने पर आपके खाते को पुनर्प्राप्त करने में मदद करती है।
Step 6: Agree to the Terms and Conditions
- Review Google’s Terms of Service and Privacy Policy.
- Click “I agree” to accept the terms and proceed.
- Google की सेवा की शर्तें और गोपनीयता नीति की समीक्षा करें।
- शर्तों को स्वीकार करने और आगे बढ़ने के लिए “मैं सहमत हूँ” पर क्लिक करें।
Step 7: Complete the Setup
- You may be asked to set up additional security options, such as two-factor authentication (2FA). It’s recommended to enable 2FA for added security.
- Once all steps are completed, you will be directed to your new Gmail inbox.
- आपसे अतिरिक्त सुरक्षा विकल्प सेट करने के लिए कहा जा सकता है, जैसे कि दो-कारक प्रमाणीकरण (2FA)। अतिरिक्त सुरक्षा के लिए 2FA सक्षम करने की अनुशंसा की जाती है।
- सभी चरण पूरे हो जाने के बाद, आपको अपने नए Gmail इनबॉक्स पर निर्देशित किया जाएगा।
Tips for Managing Your Gmail Account
- Keep your password secure: Avoid using easily guessable passwords and change your password periodically.
- Enable two-factor authentication (2FA): This adds an extra layer of security by requiring a second form of verification in addition to your password.
- Use labels and filters: Organize your emails using labels and filters to keep your inbox tidy.
- Regularly check your spam folder: Sometimes legitimate emails end up in the spam folder. Check it regularly to ensure you don’t miss important messages.
- अपना पासवर्ड सुरक्षित रखें: आसानी से अनुमान लगाए जा सकने वाले पासवर्ड का उपयोग करने से बचें और समय-समय पर अपना पासवर्ड बदलते रहें।
- दो-कारक प्रमाणीकरण (2FA) सक्षम करें: यह आपके पासवर्ड के अलावा सत्यापन के दूसरे रूप की आवश्यकता के द्वारा सुरक्षा की एक अतिरिक्त परत जोड़ता है।
- लेबल और फ़िल्टर का उपयोग करें: अपने इनबॉक्स को साफ-सुथरा रखने के लिए लेबल और फ़िल्टर का उपयोग करके अपने ईमेल व्यवस्थित करें।
- नियमित रूप से अपने स्पैम फ़ोल्डर की जाँच करें: कभी-कभी वैध ईमेल स्पैम फ़ोल्डर में चले जाते हैं। यह सुनिश्चित करने के लिए नियमित रूप से इसकी जाँच करें कि आप महत्वपूर्ण संदेशों को न चूकें।
By following these steps, you’ll have a fully functional Gmail account that you can use to send and receive emails, access Google services, and stay connected.
Create Gmail Account: Conclusion
By following the steps outlined in this article, you can quickly set up your own Gmail account, ensuring you have a reliable platform for communication and access to numerous Google services. Remember to keep your account secure by using a strong password and enabling two-factor authentication. With your new Gmail account, you’ll be well-equipped to manage your emails, organize your communications, and stay connected in today’s digital world. Enjoy the benefits and convenience that come with your new Gmail account.
- इस लेख में बताए गए चरणों का पालन करके, आप जल्दी से अपना खुद का जीमेल खाता सेट कर सकते हैं, जिससे यह सुनिश्चित होगा कि आपके पास संचार के लिए एक विश्वसनीय प्लेटफ़ॉर्म है और कई Google सेवाओं तक पहुँच है। एक मजबूत पासवर्ड का उपयोग करके और दो-कारक प्रमाणीकरण सक्षम करके अपने खाते को सुरक्षित रखना याद रखें। अपने नए जीमेल खाते के साथ, आप अपने ईमेल प्रबंधित करने, अपने संचार को व्यवस्थित करने और आज की डिजिटल दुनिया में जुड़े रहने के लिए अच्छी तरह से सुसज्जित होंगे। अपने नए जीमेल खाते के साथ आने वाले लाभों और सुविधाओं का आनंद लें।
How to Create Gmail Account Links
| Telegram | Click Here |
| Click Here | |
| Click Here |
Read Also;-
- Best 3D Printers in 2024: Top Picks for Every Budget and Skill Level
- Affordable Gaming Keyboards for Every Gamer: Under ₹3,000
- High-Performance Graphics Cards : For Gaming and Streaming Under 40000
- Samsung Galaxy Z Fold 5: The Ultimate Foldable Phone Experience
- Best External Hard Drives and SSDs: Budget Friendly Storage Solutions Under ₹5,000
- Best Wireless Earbuds Under 5000: Top Picks for Budget Buyers
- Best Microphones Under ₹5000: Ideal Choices for YouTube and Gaming
- Best Laptop Under 30000: Budget Friendly Picks
- Best Monitors Under 10000: Affordable Quality for Every Need